| Version 1 (modified by waue, 16 years ago) (diff) |
|---|
零. 環境配置
0.1 環境說明
- ubuntu 8.10
- sun-java-6
- eclipse 3.3.2
- eclipse 各版本下載點 http://archive.eclipse.org/eclipse/downloads/
- hadoop 0.18.3
- hadoop 各版本下載點 http://ftp.twaren.net/Unix/Web/apache/hadoop/core/
0.2 目錄說明
- 使用者:hadoop
- 使用者家目錄: /home/hadooper
- 專案目錄 : /home/hadooper/workspace
- hadoop目錄: /opt/hadoop
一、安裝
安裝的部份沒必要都一模一樣,僅提供參考,反正只要安裝好java , hadoop , eclipse,並清楚自己的路徑就可以了
1.1. 安裝java
首先安裝java 基本套件
$ sudo apt-get install java-common sun-java6-bin sun-java6-jdk sun-java6-jre
1.1.1. 安裝sun-java6-doc
1 將javadoc (jdk-6u10-docs.zip) 下載下來放在 /tmp/ 下
- 教學環境內,已經存在於 /home/hadooper/tools/ ,將其複製到 /tmp
$ cp /home/hadooper/tools/jdk-*-docs.zip /tmp/
- 或是到官方網站將javadoc (jdk-6u10-docs.zip) 下載下來放到 /tmp
2 執行
$ sudo apt-get install sun-java6-doc
$ sudo ln -sf /usr/share/doc/sun-java6-jdk/html /usr/lib/jvm/java-6-sun/docs
1.2. ssh 安裝設定
1.3. 安裝hadoop
1.4. 安裝eclipse
- 取得檔案 eclipse 3.3.2 (假設已經下載於/home/hadooper/tools/ 內),執行下面指令:
$ cd ~/tools/
$ tar -zxvf eclipse-SDK-3.3.2-linux-gtk.tar.gz
$ sudo mv eclipse /opt
$ sudo ln -sf /opt/eclipse/eclipse /usr/local/bin/
二、 建立專案
2.1 安裝hadoop 的 eclipse plugin
- 匯入hadoop eclipse plugin
$ cd /opt/hadoop
$ sudo cp /opt/hadoop/contrib/eclipse-plugin/hadoop-0.18.3-eclipse-plugin.jar /opt/eclipse/plugins
補充: 可斟酌參考eclipse.ini內容(非必要)
$ sudo cat /opt/eclipse/eclipse.ini
-showsplash
org.eclipse.platform
-vmargs
-Xms40m
-Xmx256m
2.2 開啟eclipse
- 打開eclipse
$ eclipse &
一開始會出現問你要將工作目錄放在哪裡:在這我們用預設值
PS: 之後的說明則是在eclipse 上的介面操作
2.3 選擇視野
| window -> | open pers.. -> | other.. -> | map/reduce |
設定要用 Map/Reduce? 的視野
使用 Map/Reduce? 的視野後的介面呈現
2.4 建立專案
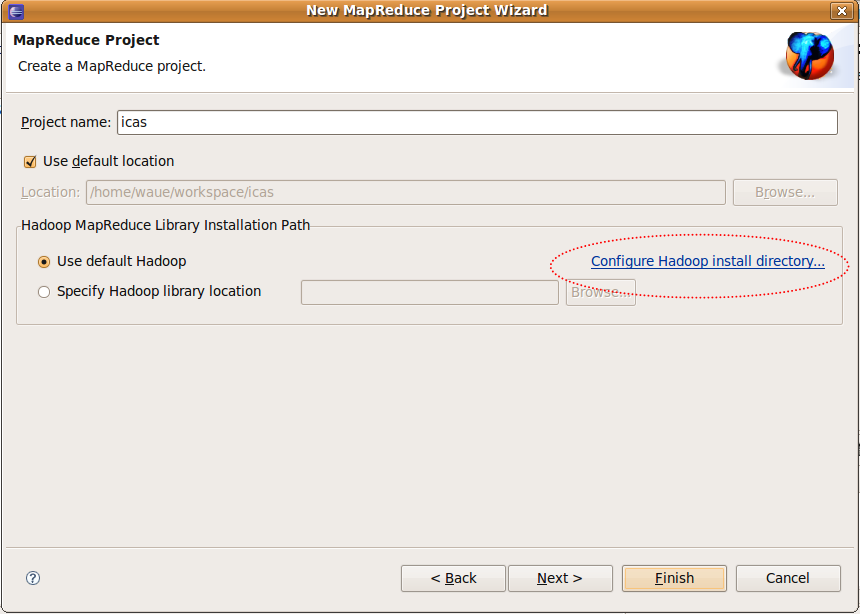
file -> new -> project -> Map/Reduce? -> Map/Reduce? Project -> next
建立mapreduce專案(1)
建立mapreduce專案的(2)
project name-> 輸入 : icas (隨意)
use default hadoop -> Configur Hadoop install... -> 輸入: "/opt/hadoop" -> ok
Finish
2.5 設定專案
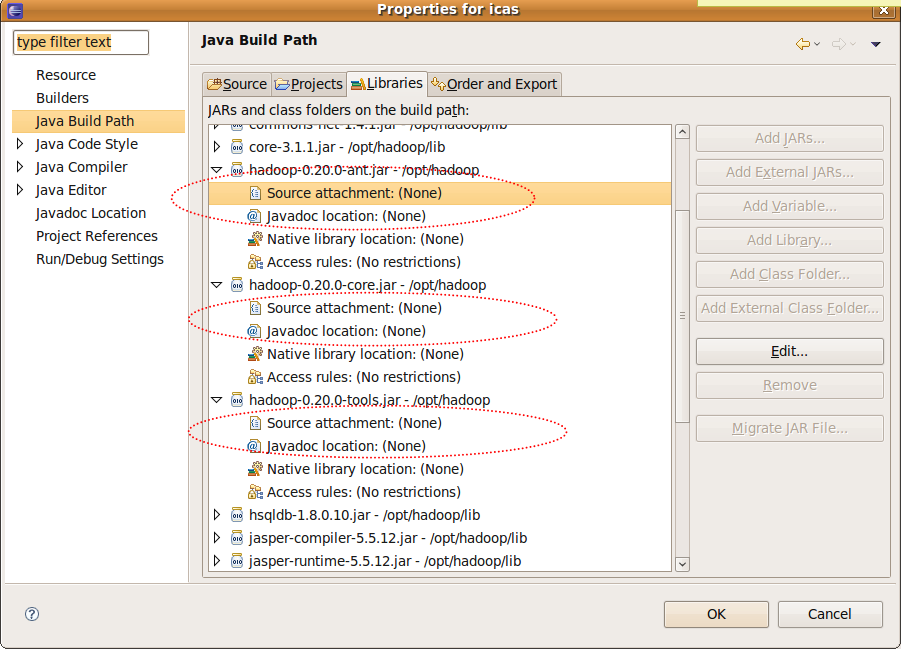
由於剛剛建立了icas這個專案,因此eclipse已經建立了新的專案,出現在左邊視窗,右鍵點選該資料夾,並選properties
Step1. 右鍵點選project的properties做細部設定
Step2. 進入專案的細部設定頁
hadoop的javadoc的設定(1)
- java Build Path -> Libraries -> hadoop0.18.3-ant.jar
- java Build Path -> Libraries -> hadoop0.18.3-core.jar
- java Build Path -> Libraries -> hadoop0.18.3-tools.jar
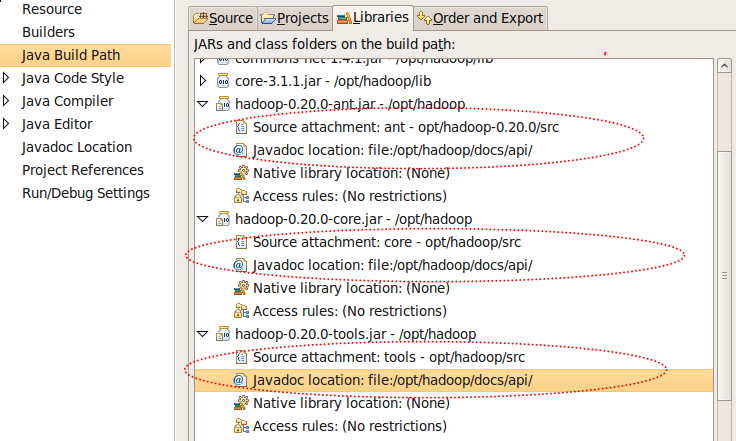
- 以 hadoop0.18.3-core.jar 的設定內容如下,其他依此類推
source ...-> 輸入:/opt/hadoop/src/core
javadoc ...-> 輸入:file:/opt/hadoop/docs/api/
Step3. hadoop的javadoc的設定完後(2)
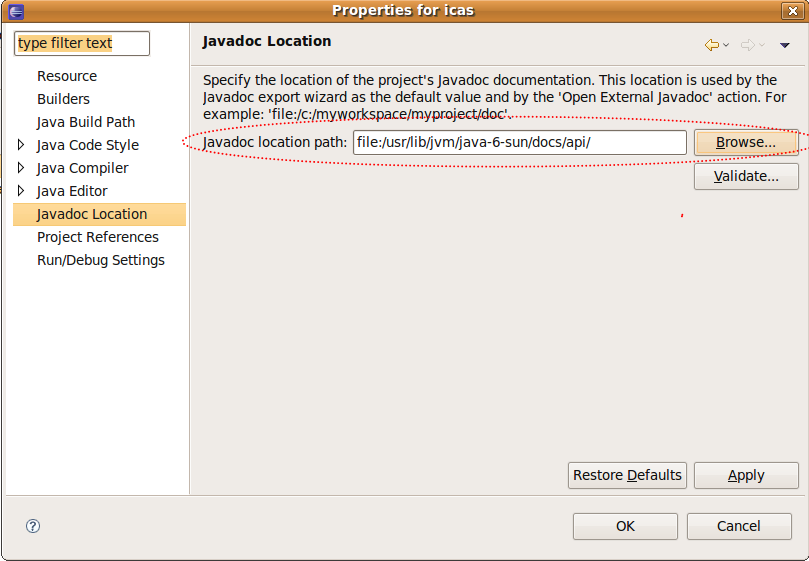
Step4. java本身的javadoc的設定(3)
- javadoc location -> 輸入:file:/usr/lib/jvm/java-6-sun/docs/api/
設定完後回到eclipse 主視窗
2.6 連接hadoop server
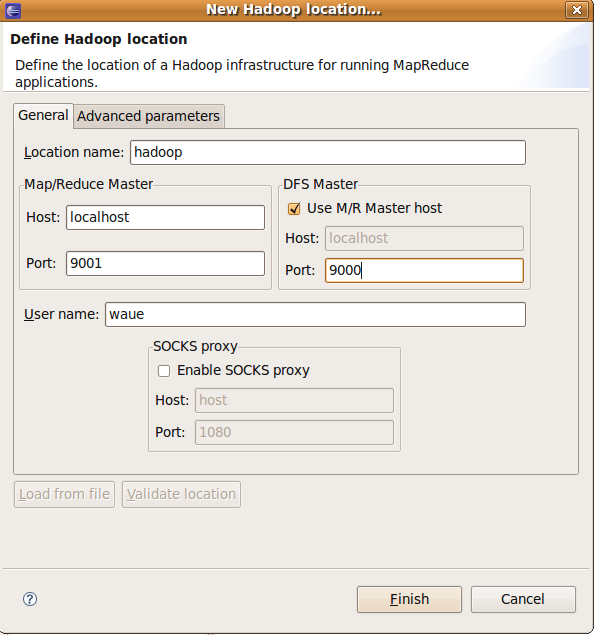
Step1. 視窗右下角黃色大象圖示"Map/Reduce? Locations tag" -> 點選齒輪右邊的藍色大象圖示:
Step2. 進行eclipse 與 hadoop 間的設定(2)
Location Name -> 輸入:hadoop  (隨意)
Map/Reduce Master
-> Host-> 輸入:localhost
-> Port-> 輸入:9001
DFS Master
-> Host-> 輸入:9000
Finish
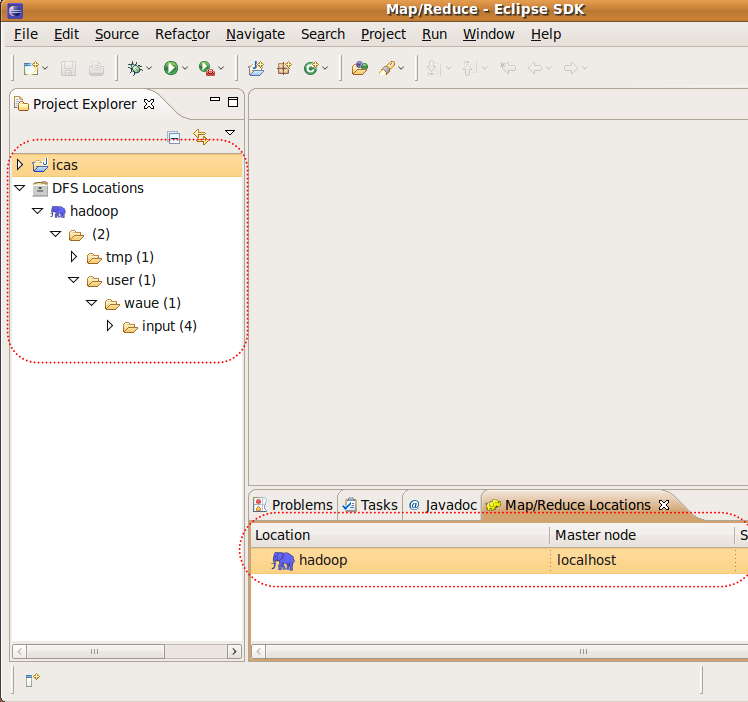
設定完後,可以看到下方多了一隻藍色大象,左方展開資料夾也可以秀出在hdfs內的檔案結構
三、 撰寫範例程式
- 之前在eclipse上已經開了個專案icas,因此這個目錄在:
- /home/hadooper/workspace/icas
- 在這個目錄內有兩個資料夾:
- src : 用來裝程式原始碼
- bin : 用來裝編譯後的class檔
- 如此一來原始碼和編譯檔就不會混在一起,對之後產生jar檔會很有幫助
- 在這我們編輯一個範例程式 : WordCount
3.1 mapper.java
- new
File -> new -> mapper
- create
source folder-> 輸入: icas/src
Package : Sample
Name -> : mapper
- modify
package Sample;

import java.io.IOException;
import java.util.StringTokenizer;

import org.apache.hadoop.io.IntWritable;
import org.apache.hadoop.io.LongWritable;
import org.apache.hadoop.io.Text;
import org.apache.hadoop.mapred.MapReduceBase;
import org.apache.hadoop.mapred.Mapper;
import org.apache.hadoop.mapred.OutputCollector;
import org.apache.hadoop.mapred.Reporter;

public class mapper extends MapReduceBase implements Mapper<LongWritable, Text, Text, IntWritable> {
    private final static IntWritable one = new IntWritable(1);
    private Text word = new Text();

    public void map(LongWritable key, Text value, OutputCollector<Text, IntWritable> output, Reporter reporter) throws IOException {
      String line = value.toString();
      StringTokenizer tokenizer = new StringTokenizer(line);
      while (tokenizer.hasMoreTokens()) {
        word.set(tokenizer.nextToken());
        output.collect(word, one);
      }
    }
  }
3.2 reducer.java
- new
- File -> new -> reducer
- create
source folder-> 輸入: icas/src
Package : Sample
Name -> : reducer
- modify
package Sample;

import java.io.IOException;
import java.util.Iterator;

import org.apache.hadoop.io.IntWritable;
import org.apache.hadoop.io.Text;
import org.apache.hadoop.mapred.MapReduceBase;
import org.apache.hadoop.mapred.OutputCollector;
import org.apache.hadoop.mapred.Reducer;
import org.apache.hadoop.mapred.Reporter;

public class reducer extends MapReduceBase implements Reducer<Text, IntWritable, Text, IntWritable> {
    public void reduce(Text key, Iterator<IntWritable> values, OutputCollector<Text, IntWritable> output, Reporter reporter) throws IOException {
      int sum = 0;
      while (values.hasNext()) {
        sum += values.next().get();
      }
      output.collect(key, new IntWritable(sum));
    }
  }
- File -> new -> Map/Reduce? Driver
3.3 WordCount.java (main function)
- new
建立WordCount.java,此檔用來驅動mapper 與 reducer,因此選擇 Map/Reduce? Driver
- create
source folder-> 輸入: icas/src
Package : Sample
Name -> : WordCount.java
- modify
package Sample;
import org.apache.hadoop.fs.Path;
import org.apache.hadoop.io.IntWritable;
import org.apache.hadoop.io.Text;
import org.apache.hadoop.mapred.FileInputFormat;
import org.apache.hadoop.mapred.FileOutputFormat;
import org.apache.hadoop.mapred.JobClient;
import org.apache.hadoop.mapred.JobConf;
import org.apache.hadoop.mapred.TextInputFormat;
import org.apache.hadoop.mapred.TextOutputFormat;

public class WordCount {

   public static void main(String[] args) throws Exception {
     JobConf conf = new JobConf(WordCount.class);
     conf.setJobName("wordcount");

     conf.setOutputKeyClass(Text.class);
     conf.setOutputValueClass(IntWritable.class);

     conf.setMapperClass(mapper.class);
     conf.setCombinerClass(reducer.class);
     conf.setReducerClass(reducer.class);

     conf.setInputFormat(TextInputFormat.class);
     conf.setOutputFormat(TextOutputFormat.class);

    FileInputFormat.setInputPaths(conf, new Path("/user/hadooper/input"));
    FileOutputFormat.setOutputPath(conf, new Path("lab5_out2"));

     JobClient.runJob(conf);
   }
}
- 三個檔都存檔後,可以看到icas專案下的src,bin都有檔案產生,我們用指令來check
$ cd workspace/icas
$ ls src/Sample/
mapper.java  reducer.java  WordCount.java
$ ls bin/Sample/
mapper.class  reducer.class  WordCount.class
四、測試範例程式
在此提供兩種方法來run我們從eclipse 上編譯出的code。
方法一是直接在eclipse上用圖形介面操作,參閱 4.1 在eclipse上操作
方法二是產生jar檔後搭配自動編譯程式Makefile,參閱4.2
4.1 法一:在eclipse上操作
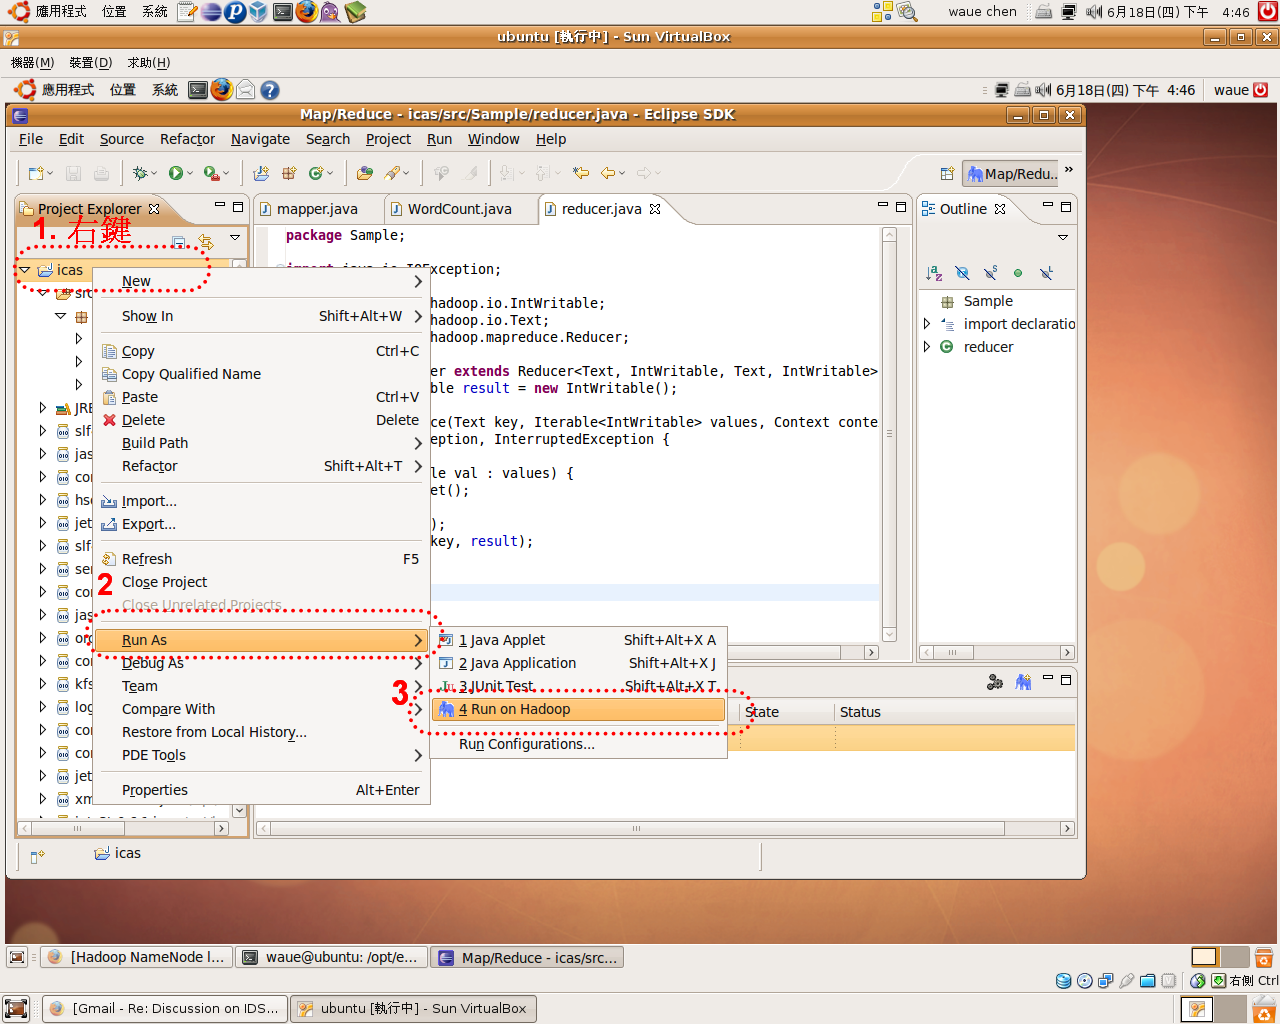
- 右鍵點選專案資料夾:icas -> run as -> run on Hadoop


